|
Camera
|
|
Randy's camera is an Olympus Camedia C-4040, 4.1 megapixel digital with
128MB smart media card, direct USB cable from camera to PC USB port. Each
raw high resolution image takes approximately 5.2 MB of space, allowing
for about 21 images before smart media card becomes full. Images are then
downloaded from camera to PC, where they are named, cropped, sized,
and edited. It is typically much faster to just copy all files from
camera to PC, and then use image editing software on PC with fast disk
access. When managing many images, it is very useful to label each beer
can and name the images to match label on the can before any other editing!
|
| |
While many types of cameras should work, and each camera will have its
own unique controls, the following were changed from the Olympus C-4040
defaults:
|
|
Flash turned off
Macro mode turned on (allows close up images)
Digital zoom turned on (allows better auto focus)
Images captured as 1600 x 1200 TIFF (about 5.2 MB per image)
Exposure adjusted from -1.0 to +1.0 depending on beer can and filter
|
| |
|
Light source/filter
|
A standard utility light with standard size light bulb was used
to provide light source, angled slightly to brighten a beer can but not
produce high glare. As for light bulb, a 60 watt soft white was used for
most images, adjusting the camera exposure higher or lower as necessary.
However, 75 watt and 150 watt bulbs were also used for some cans. Note:
if you are using a 150 watt bulb be careful, these get very hot, and
during early picture experimentation I actually melted the lens enclosure
of my camera, requiring a costly repair! Best recommendation is to keep
camera/lens completely outside of the camera box.
|
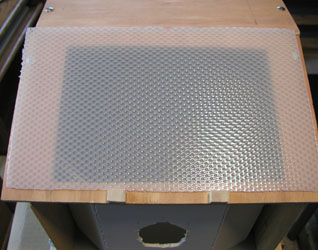
Fig 1: Standard clear flourescent filter |

Fig 2: Blue plastic wrapped flourescent filter |
| |
|
The utility light is set on top of one of two filters depending on
color of beer can. In Fig 1 the filter is a simple piece of
flourescent light cover, available fairly cheaply at most hardware
stores. This clear filter somewhat difuses the light and seems to
help eliminate most glare. |
|
| |
|
Now for cans with either red or yellow (of which many Michigan beer
cans fall into this category), images taken with above camera settings
and filter would typically have reds turned to pink, and yellows
"washed out" to a pale color. Whether or not this is a feature of the
camera used (e.g. attempt to prevent photo "red-eye"), it was not
possible to prevent this by adjusting camera settings. Instead, a
"blue filter" was used to alter the light source. This filter is
simply a thin layer of transparent blue plastic wrapped around a
piece of flourescent light cover. With this blue filter and
overexposure of +0.7 or +1.0 on the camera, images of red and yellow
cans came out with much truer colors. Note in Fig 2 how the blue plastic
has somewhat melted! Even 60 watt bulbs can get hot if let set too
long...
|
| |
|
Image settings/sizes
|
|
As mentioned in most HTML books, any referenced image should include
both the image's height and width within the HTML. This allows the web
browser to process things like formatting and centering
of text without first need to fully load the image to determine
height/size (much more important over internet than local disk).
All HTML generated for MBC will specify a height and width for each
beer can image.
|
| |
|
Not only is the above of interest to performance, it is also just as
important for consistency. To that end, all beer can images included
in MBC will have the exact same height/size depending on can size. The
image editing process went as such:
|
|
Copy images from camera to PC
Use Olympus Camedia software to view thumbnails and rename all TIFF files
Open each TIFF file in Adobe Photoshop
Rotate can image 90 degrees clockwise (remember camera was mounted vertically)
Crop each beer can with approximately same spacing around each can
Change number of pixels from default of 72/dpi to 1200/dpi
Resize each beer can to appropriate pixel height (see following tables)
Adjust canvas size to appropriate pixel width (see following tables)
Save as {filename}_Fx.jpg file (full back, front, left or right image)
Repeat height resize and save for Large, Medium, and Small images
|
| |
The following tables show pixel sizes of each image depending on type
of beer can:
|
| 12 oz Flat/Tab |
| Full |
460 x 880 pixels |
| Large |
267 x 510 pixels |
| Medium |
162 x 310 pixels |
| Small |
65 x 125 pixels |
|
| 12 oz Cone Top |
| Full |
420 x 880 pixels |
| Large |
243 x 510 pixels |
| Medium |
148 x 310 pixels |
| Small |
60 x 125 pixels |
|
| |
| Crowntainer |
| Full |
460 x 880 pixels |
| Large |
267 x 510 pixels |
| Medium |
162 x 310 pixels |
| Small |
65 x 125 pixels |
|
| 16 oz Flat/Tab |
| Full |
360 x 880 pixels |
| Large |
209 x 510 pixels |
| Medium |
127 x 310 pixels |
| Small |
51 x 125 pixels |
|
| |
| 8oz Flat/Tab |
| Full |
500 x 680 pixels |
| Large |
279 x 380 pixels |
| Medium |
191 x 260 pixels |
| Small |
92 x 125 pixels |
|
| Quart Cone |
| Full |
420 x 880 pixels |
| Large |
243 x 510 pixels |
| Medium |
148 x 310 pixels |
| Small |
60 x 125 pixels |
|
| |