![]() Import
From Canventory
Import
From Canventory
Disclaimer: I did not write the Canventory software, have no access to the Canventory source code, and more importantly no definition of the Canventory binary file formats. I simply spent some hours using a Hex-Editor and trial and error byte mapping of different file formats. As such, it is very possible I have missed something in my understanding of the binary content and CanDB may throw exceptions with unexpected content. All I can say is your original Canventory content is perfectly safe since I open for “read-only”, and worst case is CanDB won’t be able to import. If you do enconter problems I will attempt to fix CanDB to handle the given exceptions.
Note regarding import of the USBC text field: Canventory has just a single reference field labeled “USBC”. While the CanDB import dialog allows you to choose whether this refers to “USBC 1” or “USBC 2”, what if you used this reference field for BCU, Class, Lilek, Bible, etc? To handle these cases CanDB will first split any value in this field by a “-“ (dash) character. If there are digits on both the left and right of the dash this is a reference with page number – item number (e.g. USBC, Class, BCU). If there is no dash, then assumed just a single item number (e.g. Bible, Lilek). To decide which reference, CanDB looks for any letters before the first set of digits. Case of the characters doesn’t matter, so Lilek, LILEK, and L all mean the same. Some examples:
|
L124 |
Lilek 124 |
|
B 95-23 |
BCU 95-23 |
|
Lilek 75 |
Lilek 75 |
|
BCU 25-12 |
BCU 25-12 |
|
B 36 |
Bible 36 |
|
94-20 |
USBC 94-20 |
|
Bible 7 |
Bible 7 |
|
XYZ |
“blank” |
Step 1: CanDB “File -> Import From Canventory”
Within CanDB, choose the menu item “File
-> Import From Canventory” which will open the following dialog. Note: You
can only import into an empty project. If
your project has at least one brewery or item defined, the Import From
Canventory menu item will be grayed out.
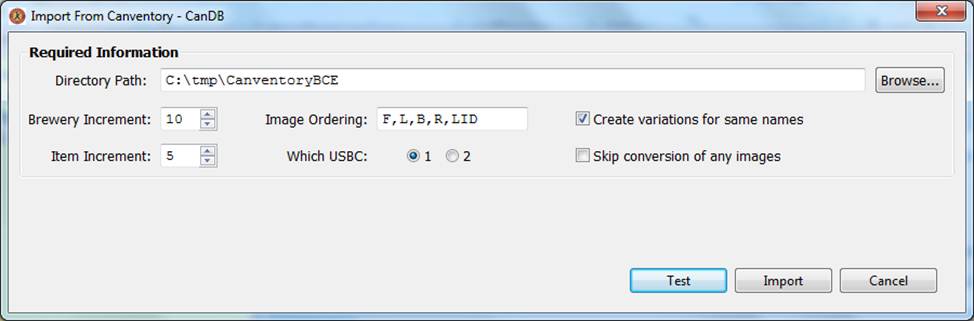
While Canventory allows user additions to lists such as CanTypes, Eras, Breweries, etc, all those formats are able to be reversed engineered requiring no additional CanDB user input for being able to decode. As such, the “Import From Canventory” dialog is much simpler than “Import From File”. The following are required input, and very likely you can simply use all the CanDB defaults:
|
Property |
Description |
|
Directory Path |
This is the location on your computer where Canventory saves its data. Surprisingly, this is not mentioned anywhere in the Canventory help, and never mentioned in the program. I only found this directory by saving some changes and searching my computer for files recently changed. My guess is all Canventory users get the same $HOME/path since I saw no option to choose an alternate location. |
|
Brewery Increment |
How to number the generated CanDB breweries. Recommendation is increments something like 5 or 10, not consecutively numbered 1..N. While you can always re-number, start with the default. |
|
Item Increment |
How to number the generated CanDB items within a given brewery. Same as above, recommendation is increments something like 5 or 10. |
|
Image Ordering |
CanDB understands the differences between beer cans with “one face” and “two faces” (with front and back having the same design). Within CanDB all beer can images are explicitly tagged as Front, Left, Back, Right and Lid, and images adjust depending on the number of can faces configured for a given beer can. There is no such option in Canventory, just a set of images 1 .. N. This option is used to allow user definition of how they entered their images into Canventory, with assumption that Image 1 is can Face (F), Image 2 is can Left (L), Image 3 is can Back (B) and Image 4 is can Right (R). Please adjust/change these values to most closely match your Canventory usage. Otherwise, once images are copied into CanDB you can always right click and “Adjust” to swap images to their given slot type. Most importantly is for a can's Face/Front to be tagged correctly (likely Image 1) since the front is used for all pictorials. |
|
Which USBC |
Canventory has a single reference field named “USBC” since the program was written before USBC 2 was produced. The default during import is USBC 1 (flats/cones) but can be changed to USBC 2 (tabs) if your data is tabs. |
|
Create Variations for Same Name |
CanDB stores items in folders based on short name, as such, does not allow multiple items to have the same name. If you have two items with the same item name, CanDB will either add digits to end of the names (the default) or if you check this box “true”, same named items will be added as variations to the first found base item. Within my CSS and MBC projects I have numerous variations that differ only by canning company, code, seam, lid, etc. |
|
Skip Conversion of any Images |
This was mostly used for CanDB testing, but you may choose to import Canventory data but not the images. While the CanDB copy and conversion of your Canventory images will take some minutes, recommendation is to leave this option unchecked (false). |
Step 2: Click the “Test” button
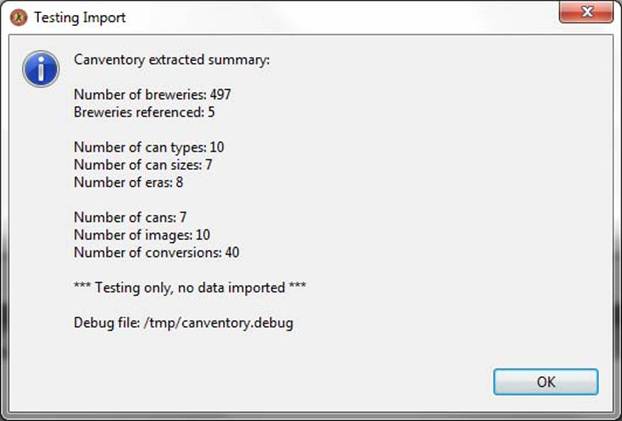
Before importing data, click “Test” which will cause CanDB to parse your Canventory files and report what "would have" been imported. This ensures CanDB is able to properly read all Canventory files as well as results consistent with what you expect in your project before any actual import. Test results will be reported by a dialog similar to the following. Note the last reported line is path to a text debug file echoing information extracted from Canventory. You may choose to review this debug file with any text editor before actual CanDB import.
Step 3: Click the “Import” button
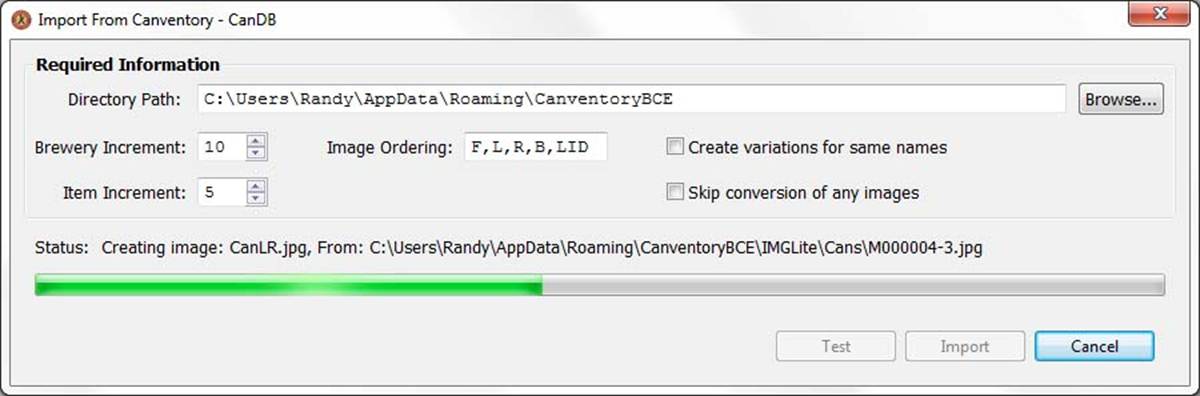
Assuming no errors with CanDB reading the Canventory data files, the import dialog will display a Status and Progress Bar showing current state of the import and image conversion. Parsing the textual information and creating CanDB brewery/item objects is very fast, copy and rescaling your Canventory images will take some minutes, but at least the computer is doing the work for you! The progress bar is based on the number of file conversions that will take place so should give a fairly accurate idea how much longer the import will take. Note that you can Cancel at any time but if you do Cancel, your imported data will likely not be complete.
Canventory database and CDS content
It has been many years since I have written any computer storage of data in binary format, with industry standard now textual XML, or at least clear text ASCII. After all, the data is the user’s information, and best to not hide any of this. To be able to reverse engineer Canventory binary content required hours using a Hex-Editor and byte-for-byte decoding and trial/error, something I hadn’t done in over 15 years! Simply put, I found this an interesting challenge and took on this task simply to prove I could still do it!!!
Canventory content appears to be fully contained under C:\Users\<your name>\AppData\Roaming\CanventoryBCE. Under this directory is a sub-directory named “binLite” which contains your data content, and “IMGlite” which contains copies of all your original images. Under the binLite directory are a number of files, most importantly ending with the “.cds” file suffix such as “Cans.cds”, “CanTypes.cds”, “CanSizes.cds”, etc.
The format of the “.cds” files are interesting to say the least. I was surprised to see variable binary format (record format varied per each entry depending on bit masks) and more so the file is a “running log” of all changes you have made to your content! If you edited a given beer can’s content 10 times (e.g. changing images, updating USBC, checkboxes for IRTP, etc), each of these 10 edits and save keeps a complete history of the original plus new changes. When Canventory reads the files the last known changes for a given item is what is displayed, all the earlier edits silently skipped. My assumption is the Canventory author simply used an existing data storage C++ library which either government or corporate usage required 100% traceability of all changes. Definitely not necessary for beer can information, and personally, would have been much simpler just to have written same size C++ objects with “0” length strings for unused fields.
If you require more details on the other Canventory files or more about the mentioned data content, you will need to contact the Canventory author. From my perspective I have been able to extract all useful information which maps to CanDB terminology and no more use of these file formats.