![]() HTML
Tab
HTML
Tab
The "HTML" tab and more specifically the "Generate HTML" button will be used frequently within CanDB. Once data is entered for a given set of items, you will want to generate HTML pages for the entered data/images. These generated pages are standard HTML and able to be viewed by any web browser, providing a very cross platform and almost any computer device viewable set of composite information. For example, CanDB does not run on the basic Windows Surface tablet (it does on the Surface Pro), but the generated HTML is fully usuable within the tablet’s web browser.
Recommendation is to start with all the HTML defaults of "everything", and only de-select items you determine won't be used within the project, or you choose to not want to include the given type of data on your pages (e.g. don't want to show Cost/Notes data except for personal generated web pages). Generating the HTML is as simple as clicking the "Generate HTML" button and viewing the HTML as simple as copy/paste of a given HTML file path into a web browser URL entry box. Once your browser has bookmarks to a given page (e.g. the top level Table of Contents page for a given project), simply click the browser Refresh button after you generate new HTML.
The different HTML options are described below. Note that the configuration changes do not affect any existing HTML pages until you make selection changes, click "Save Config", and then "Generate HTML" to update pages. If you have unsaved changes and click the “Generate HTML” button, you will be prompted whether to generate HTML with previous values or save and then generate.
|
Category |
Description |
|
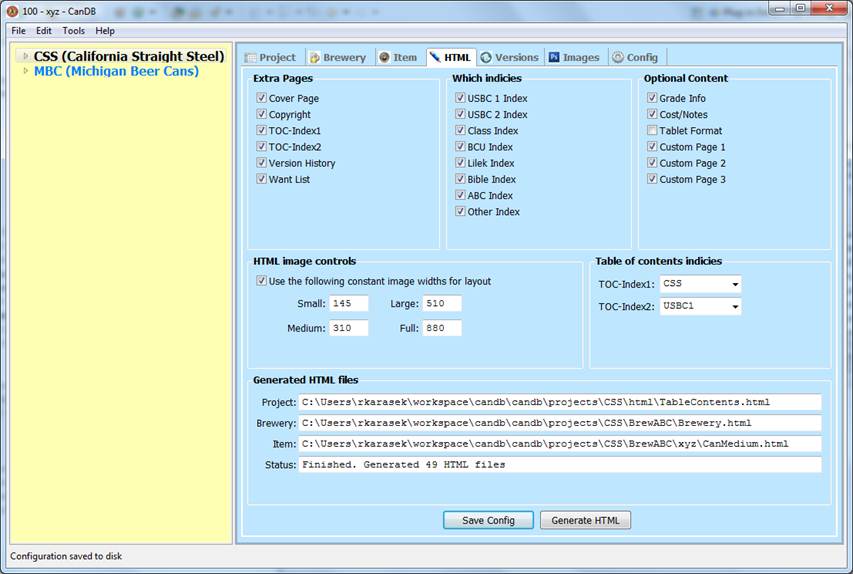
Extra Pages |
Recommendation is for all projects to include all five pages of Cover Page, explicit Copyright page, two cross reference index pages, and a Version History page. However, if you really don't want these pages, simply uncheck the given check box. |
|
Which Indicies |
When generating the "medium" and "large" HTML pages for a given beer can, there is a table for indexes into other beer can references (e.g. USBC 123-12 is page 123, item 12 in the USBC). If you don't plan on ever entering index values for some of these references there is little reason to print empty table cells for these references. Simply uncheck the given index box(s) you don’t plan on using. |
|
Optional Content |
All pages will include the standard name, brewery, item type/tag and such. However, if you are generating web pages for your own personal usage, you can include grade information (Grade + Grade Text) or collection information (Cost + Notes) in the tables for the "medium" and "large" HTML pages, as well as some of the pictorials. This can be quite useful for managing your own collection. For generation of HTML for publish to a web site, recommendation is to uncheck both these values unless you explicitly want to share collection information with others. |
|
HTML Image Controls |
By default this option is NOT checked, but I use this for both CSS and MBC web page generation. If all your pictures are taken and cropped to the same heights and widths, recommendation is to enable this option since will make viewing of your web pages “look better” while downloading from web site. Please see the following section “HTML Image Controls” for details. |
|
TOC Indicies |
Combo box selections to define which of the two index references to use on the Table of Contents page. Recommendation is to use your own composite reference numbers for one choice, and then some other publication which most closely covers your project content. |
|
Generated files |
These text boxes show the full path to the HTML pages for the currently selected project, brewery, and/or beer can, along with a status box showing details of the current page being written. A reasonable size project can expect 1000's of HTML pages to be generated! |
Viewing the generated HTML
Plans were to include a basic browser window within the CanDB project, but decision was made to simply have an open web browser and view the content within the web browser. As such, you simply need to have your web browser open the desired file as the URL. Easiest way to accomplish this is to click on the selected HTML file path, “Ctrl-A” to select the the entire file path, “Ctrl-C” to copy the file path, and within your web browser URL window, “Ctrl-V” to paste the path. Select one of the Generated HTML paths as your starting point for viewing.
For the MBC and CSS projects, I maintain a bookmark to the generated TableContents page for the project such that I can always view the generated HTML content without need for CanDB to be running.
HTML Image Controls
 When
CanDB copies/converts images, four different sizes are created, Full, Large,
Medium and Small. Depending on the generated web page, the appropriate size
will be used. For example, when viewing pictorials all we want are the “small”
JPEG files to make the web page download much faster. However, when wanting to
see the most detail, we use the “full” JPEG files. Many more pixels but slower
to load.
When
CanDB copies/converts images, four different sizes are created, Full, Large,
Medium and Small. Depending on the generated web page, the appropriate size
will be used. For example, when viewing pictorials all we want are the “small”
JPEG files to make the web page download much faster. However, when wanting to
see the most detail, we use the “full” JPEG files. Many more pixels but slower
to load.
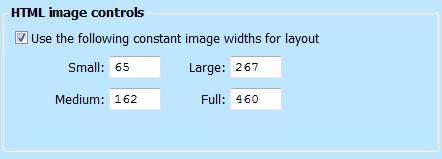
The height of these types is hardcoded in CanDB and NOT able to be configured. Specifically, Full = 810, Large = 510, Medium = 310 and Small = 125 pixels are hard coded into the program and can’t be changed. During image copy/conversion, the width is NOT specified, such that it automatically remains in proportion with the original dimensions. For example, if the original image was 810 pixels height and 460 pixels in width, when converting to a Small image of 125 pixels height, no width specification causes the resulting width to be 65 pixels to retain exact original proportions.
For the CSS and MBC projects I crop all my images to exactly the same size (810 pixels tall and 460 pixels wide) BEFORE importing into CanDB. Thus, all my scaled Full, Large, Medium and Small pictures will be exactly the same heights and same widths. All my Small images are 125 pixels tall and 65 pixels wide.
When generating HTML web pages, I check the above option AND specify constant image widths. If this option is enabled, the generated HTML will provide both a height hint and width hint for a given image, such that web browsers are able to pre-allocate exact pixel space during a page download, so able to fill in the exact pixel size image later. Most web browsers will download the text first, leave place holders for the images, and then download images one by one to provide better browsing response.
If you DON’T enable this option (by default this is not enabled) then no width hint will be used in the generated HTML. This will require the web browser to “guess”, and will often cause the browser to guess too big, and as images are downloaded the text will shift around until exact sizes are known. Additionally, if you didn’t crop all your images to exact same widths before import into CanDB, then on a given pictorial one small picture might be 70 pixels wide, another one 68 pixels, another one 74 pixels, etc. While nothing wrong by doing this, your pictorials will not look aligned, with pictures in a given column not fully aligning exact widths. If this CanDB option is checked, constant width hints are used which will correct the alignment, such that every image looks the same height and width, but possible the image minorly distorted by forcing adjustment of both height and width. For most images you can’t tell the difference of minor distortion to the desired width, but your mileage may vary. Again, I use this option, all my images are the same height and width, and my generated HTML will download nicely and look consistent, all pictorials nicely aligned.